
The No Bad Photos blog is moving to the Beautiful Fairy website!
www.beautifulfairy.com.au/index.php/news-updates/
Please come and have a look for more photography tips, news, special sales and discounts.
Wednesday, September 8, 2010
Saturday, August 14, 2010
Compact Camera Photography Tips: skylines and polarisation
My friend Iona has been one very lucky duck and has been travelling throughout Canada and parts of America over these past few weeks. She has been sending back some amazing photos that have made those of us sitting here in rural Australia freezing our butts off very jealous (but also very happy for her). She mentioned a little while ago that she wished she had invested in a better camera for her architectual shots. So I began wondering what tips I could give Iona to perhaps improve her photos for this trip. Then one day it occurred to me- polarisation.
I looked up Wiki to try and get a good explanation of a polarisation filter and what it does, but got a whole heap of stuff about light waves and reflective bounce (YAWN), so I will simplify. A polarisation filter makes the sky a darker blue. However, there is a way to get a similar effect, that will not be as pronounced, but still will give you a nice shade of blue on your compact. If nothing else, it will give you a good shade of blue to tweak in Photoshop.
Before composing your shot, you need to find the best angle for polarising light. To find this simply point your fore finger at the sun and your thumb at the sky. Rotate it left to right. The arc that your thumb points out will be the best area to shoot towards to make the sky blue.
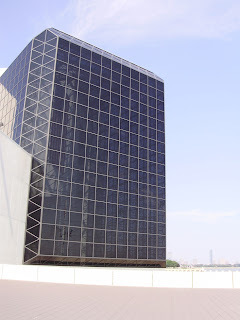
 Hopefully that helps. I also have some examples to show how effective this simple technique can be. Both of these photos were taken by me in Bruges last year.
 This first image is shooting to the west at sunset. You can see the sky is very washed out, with no blue at all. The camera struggles with the light elsewhere in the shot.
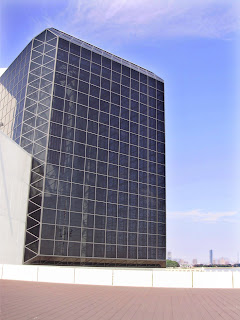
  By turning 90 degress- not even taking a step- the lighting is completely different. The sky has a nice vivid blue to it. At the same time, this angle gives nice shadows and texture to the buildings and provides reflections on the water. The colours in the brick are much richer.
 And as a special thank you to Iona for giving me the idea for this post and for allowing me to use her as an example, I have boosted the colours (and done some other stuff) to one of her photos that unfortunately my advice came too late for, but I know she loves this image.


Credits: Iona, 'A Double Helping of Pei'
Thank you Iona!
Saturday, August 7, 2010
Travel photos- Sunset in Brugges

I have been working for some time now on an album for my Mum about a holiday we took last year. Holiday is probably not the quite word- it was something of an epic journey. Myself, my Mum and my daughter travelled through Belgium, then to the UK to spend time in London, Edinburgh and York. It was an absolutely amazing journey.
To begin with, we have the photo taken by my Mum on her compact digital camera. In Brugges, the walkways are probably just wide enough for a car to drive down slowly, as long as no one is coming the other way! Which is why everyone rides bikes in Brugges. This, coupled with the tall buildings and the setting afternoon sun meant that the light was quite low in the lane we were walking through. Behind, the clock tower is set against a rather over exposed sky. Its features are not clear. The entire light balance of the image is wrong, and although the composition is good, the image is not great. I don't think there is alot that my Mum could have done to improve the lighting. Turning the flash to manual and turning it on may have helped to light me a little, but we are standing so far back, I don't think it would have made alot of difference. The photos that I took using my SLR had similar light problems. So in my mind, this one was a job for Photoshop.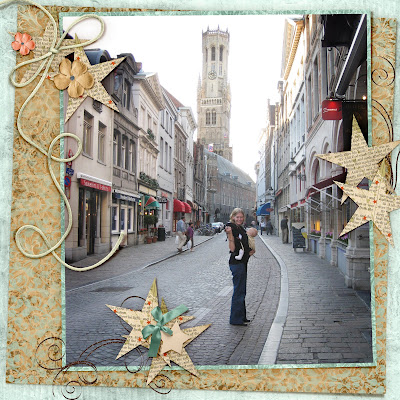
Lighting adjusted, tone improved, cropped, and then framed in gorgeous colours and elements. The colours are better and the eye is drawn to the figure in the middle, and then along to laneway to the buildings and the clock tower, before out of the frame. *Sigh* I love Photoshop!
Credits: Laura Burger, Days Get Shorter
Wednesday, August 4, 2010
Evolution of a page part 2

And here is the finished page- I have worked on shadows, altered the background and well, spent a very long time working on this image! But I think it was all worth the effort!
We allow for one of these fantasy style pages in every package.
Graphics Credits: Randi Oh: Me Myself and I, Marche aux Fleurs, Bella Joy, Bella Noel; Sussie M secret Garden, Little Piece of Love, Here Comes Spring; New Life Dreams: The Tender Moments. Photo by Melissa Wood from Melissa Wood Photography
Tuesday, August 3, 2010
Evolution of a page
I have had the most pleasant evening working on a photo by Mel Wood, from Melissa Wood Photography (Wagga Wagga based) and wanted to write a short post about the evolution of a page, and what we can do at Beautiful Fairy that you don't really get anywhere else.
Here is the initial photograph by Mel (that I absolutely adore and wish I had thought of it when my kids were babies)

And here is the half completed page, with some of the editing. With a bit of playing around, I lengthened the net and hung Baby from the branch:

Next, it is time to work on that background, and those shadows. The page is so flat and lifeless right now! BUT at this minute (11.26pm, to be exact) it is time for bed!
Thursday, July 29, 2010
relax: Josie at Hyde Park
And using one of the photos edited yesterday, here is the finished page:
 Laura Burger: Take the Edge Off
Wednesday, July 28, 2010
Josie at Hyde Park
I am currently working on a lovely new kit by Laura Burger, for this weekends Gotta Grab It at Gotta Pixel, and I wanted to post the photos I will be using. I have spent the morning editing and touching them up, and now I am onto the fun stuff! I think it is a really nice example of how Louise and I can take nice photos and turn them into special, frame worthy pictures.


Before- lovely shot of Josie but very dark. And after- a much clearer view of that pretty face!
And this one is my favourite:


I adjusted the lighting, added some colour, and zoomed in nice and close, and also removed those distracting legs in the background.
More to come soon!
Tuesday, July 6, 2010
Better photos with a point and click camera
I was talking about cameras and photo taking with my father in law the other day, and he was lamenting the slowness of taking photos with his camera. He bought his first digital camera the day before our wedding day (almost seven years ago) and has been a passionate convert to digital photography ever since. He is the stereotypical grandfather with the camera out snapping incessently at the grandchildren since my son was born 4 years ago.
I have had this conversation with others before. As I mostly use my SLR, I don't think too much about the time delay. But on a recent holiday with my family in Melbourne, I used Teddy's point and click the entire time, and suddenly realised what the problem was. I thought I would write a short post about WHY your point and click is so slow.
Most people who have a compact digital camera had a compact film camera. Now, film cameras have their lenses set at 35mm. This means that the lens was fixed. (The zoom film compacts had the same time delay that digi cameras have). This means that a set area was in focus, and other areas were not. Usually, about a metre and beyond was in focus, and anything closer was not. As a result, when you took a photo, the camera did not have to focus, because the focus area was set. If you main subject was 30cm or 10 metres from the lens, it didn't matter. The same area was in focus regardless.
Digital compact cameras do not work in this way. They are much smarter. They will find a face or the main feature in a photo, and set the focus accordingly. All of this takes time, which is why the camera has a delay. You have probably seen the little rectangles appear on the viewer, the beep, and then the flash and the camera takes the photo. That 'beep' is the compact camera telling you it is focused.
"Big woop" you say. "So my camera is slow. I'm not going back to film."
Well no. BUT I can help you get over that delay, and work with it, not against it.
The digi cameras operate on the same system that SLRs work on. Here is what you do:
Line up your subject. SLOWLY depress the button to about half way. The camera will then focus and 'beep'. Then, press the button THE REST OF THE WAY. See how quick that is? Almost instant. The delay is not slow technology, or operator error- it is the camera finding the focus.

We were walking along St Kilda Pier when I took this photo. I could see Ted walking along the barrier, and as he was moving so fast I knew I would not be able to get him in focus. So I lined up the lamp-post, half pressed the button, and then when he was almost at the post, I pressed it the rest of the way.
The best way to learn about this is to practise. It takes some getting used to. But digi cameras cost nothing but time, so get out and enjoy using your point and click!
Sunday, June 27, 2010
Yesterday we launched ourselves at Mathilda's Market in Canberra, and last night after I got in Teddy helped me draw the winner.
Congratulations Marnee, we will be in touch today!
We will be running another sign up to win promotion from today until August 31, so refer your friends for more chances to win!
Also, for those who would prefer (or just really enjoy) to receive their newsletter by post, just pop your postal address into the email field, and we will post a printed version to you every season (Australian residents only).
Best of luck, and congratulations to Marnee!
Monday, June 21, 2010
Mathilda's sneak peak

We are in the final countdown to our launch at Mathilda's market this Sunday. We are mainly going to show examples of our Memory Albums, but also thought it would be nice to offer some cards for sale. Here is a sneak peak of two beautiful designs Louise has created.
We will have a collection of cards to celebrate new babies, twins, birthdays, baby showers... the list goes on!

Finding the right card can be just as difficult at times as finding the right gift. We often see so many mass produced cards, which although are lovely, they do not always capture the essence of the moment. I keep and treasure every card that my children have been given. Long after the toys have gone out of favour or the clothes have been outgrown and handed on, cards are a beautiful reminder of the gifts and the moment that was celebrated.
We hope that our cards offer a nice alternative. Each card is from a very limited print run. Some of the artwork used is created by us, and others are purchased from other women running small at home enterprises. Some are designers, others photographers. We feel very special to be part of this community striving to add beauty to the world.
With thanks to SussieM for Little Piece of Love and Here comes the Spring
Thursday, June 10, 2010
Sign up for your chance to WIN!

To celebrate our gorgeous new fairy and our new product line, we will be giving away one of our Personalised 8x10 Wall Art prints. To enter, all you need to do is sign up for our newsletter. Already a subscriber? Then tell your friends, and ask them to write your name in the 'referred by' field, and you will receive an entry also. We will be drawing the winner at the end of our day at Mathilda's Baby and Childrens Market in Canberra on June 27. The prize is for a $65.00 voucher to Beautiful Fairy, which you can use on an 8x10 print or for another product of your choice (but is not redeemable for cash). Our newsletter is only seasonal, so we won't clog your inbox (unless we have something really special to share) and is a mix of tips and ideas for capturing and preserving special memories, news from Beautiful fairy and sales, discounts and competitions. So sign up today for your chance to win this very special and unique prize.
Monday, June 7, 2010
Personalised Baby Books
This month we have launched a new project, especially designed for busy Mums and Dads who are too busy getting by, and having fun. We all know what it's like to look back and realise that a month has flown by without us noticing. So often we start out with every intention of filling in every page of that Baby Book, but look back, filled with guilt, when we realise that we barely made it half way through.
Our Baby Book subscriptions were created to help you compile all of those special memories, to capture and treasure every moment.
Louise and I worked together on an album for our dear friend Mel as a record of Finns first year. Mel is a very busy Mum, working part time and sharing parenting with her husband Justin. Finn is a very active, happy and busy boy. When we started working with Mel to create her album, we found that some months things were so busy for her that there was only one or two photos of Finn. She was not 100% sure of when he achieved his milestones but we had a rough idea. What she did know was that she didn't want to risk losing any more special moments.

Jofia- The Whispering Sea
Our Baby Book subscriptions were created to help you compile all of those special memories, to capture and treasure every moment.
Louise and I worked together on an album for our dear friend Mel as a record of Finns first year. Mel is a very busy Mum, working part time and sharing parenting with her husband Justin. Finn is a very active, happy and busy boy. When we started working with Mel to create her album, we found that some months things were so busy for her that there was only one or two photos of Finn. She was not 100% sure of when he achieved his milestones but we had a rough idea. What she did know was that she didn't want to risk losing any more special moments.
Jofia- The Whispering Sea
These photos were taken when Finn was 6 months old. This is a great example of how quickly time can fly, and how sometimes we are so busy enjoying the moment that we don't necessarily want to stop and take photographs. These were the only pictures Mel and Justin had of Finn this month. Louise was able to tranform these 2 pictures into a fabulous page that tells the story of Finns growth and his exploration and discovery of the world as he grows.
For more information on our Baby books and to see the rest of Finns album, please visit our website at http://www.beautifulfairy.com.au/
Best wishes, Sam
Monday, April 26, 2010
Scrapbooking scanned photos
Ted's camera has been found, but unfortunately, not in the best of shape. We can't be sure what is broken, but it turns itself off and doesn't take photos. Which kind of defeats the purpose of it, really.
I hate having a silent blog, so thought that I would share a different type of 'No bad photos' project that I am working on. I have been working on a lifebook memory album that is to be a gift at her surprise 60th (she's apparently not on the net much, and I have been given permission to share this, so don't worry, I won't ruin the surprise!)

I hate having a silent blog, so thought that I would share a different type of 'No bad photos' project that I am working on. I have been working on a lifebook memory album that is to be a gift at her surprise 60th (she's apparently not on the net much, and I have been given permission to share this, so don't worry, I won't ruin the surprise!)
Unfortunately, there are not many photos to use in the book. There are no childhood photos- the oldest photo is taken on her wedding day. Also, there are very few pictures, as she is a Mum and- you guessed it- all the pics were taken of the kids. So we have a collection of just over 30 images to use, to tell a life story! So even though some pictures are blurred, over exposed, have average composition, and other problems, there is no other option- I have to use them.
To begin with I have scanned them in at 1200dpi. This isn't for any particular reason, simply because I can. It gives me the best quality and lets me have a large image to work with in Photoshop. I use alot of CS3's automatic setting for colour, etc.
The importance of each photo is the story it tells, and so by focusing on that we have been able to begin telling a story using a special collection of pictures.
This is one of my favourites so far- they focus on happy times and a silly, laughing Lynne! As they are older photos, I used some worn overlays to give the feel that this is a collection of old pictures and treasured memories- which, it is.
Credits: Natali Fall delight; Natali the whisper about fall; Natali Variation; overlays by Shawnrey Mathis Distressing Photos
Monday, April 12, 2010
Well, as Teddy's camera remains missing in action, I have made the momentous decision to go looking to buy a new one. I will be on the search for something similar to what he has. The poor little guy, he walks around saying 'Where is my camera? I need to take a photo.'
So there is my mission for today... I am still deciding... eBay or second hand shop?
So there is my mission for today... I am still deciding... eBay or second hand shop?
Sunday, March 28, 2010
Perfecting great photos

I was lucky enough this past week to have the honour of making a beautiful page for one of our clients. It was intended as a gift, and I still feel very special to have been able to scrap it. It was a lovely photo, but once I started to work with it, that background- which is only slightly distracting on the image- became REALLy annoying.
So I decided to take it out.
It took quite a bit of work- there is only one way to remove backgrounds, and that is slowly with alot of patience. I used
a tutorial from Take Out Photo which was fantastic for getting things started. The end result looked like this:

I know this is not a fantastic looking picture- some of you would probably prefer the original. BUT this picture was not intended to be left looking so stark and boring, because then came the best bit: adding in the elements!
 I made a mask to fit the photo and also erased and added in bits. All in all alot of fun at this part! The final print has a lovely dreamy feel, and the focus is completely on this couple celebrating their wedding.
Credits: Phuong Pton- Tropical Oasis; Natali word art overlays
A big thank you to Eliza for allowing me to share her print with you all here. :)
Thursday, March 25, 2010
Amateur photos- we love them!
 Credits: Randi Oh: me Myself and I, Garden Delights, Shades of Blue; Maelia: Mysteryland; Kasia:Lavendar Dreams, Chocolate Fall, Sweet garden, the Spring is coming, Whimsical Poetry
I cannot tell you how much FUN I had making this fantasy page about Teddy's photography. As a rule I do not make fantasy pages, but I am starting to experiment with them more and more, and not only do they make a wonderful change from my standard approach, they also make me REALLY concentrate on my shadows and the small details of a page. I love altering the perspective and making the shadows lie flat on the ground.
Except for the photo of Teddy in the middle, all of the photos were taken by him. He loves his photography, and I loved making a page about his growing interest. And some of the photos are quite good- and some of them are close ups of the grass, and quite a few of his toes! BUT they are still his photos and they still are part of his story, doscovering the world and trying different interests until he finds ones that work for him.
Wednesday, March 10, 2010
ADSR Challenge 9

The current challenge for ADSR is up- that's the Amazing Digi Scrapping Race- and this one lookslike alot of fun. I've decided to make it into a real challenge for myself, and am going to scrap some of Teddys photos. I really want to make a page to capture his growing interest in photography and his fascination with the world. I have not decided on all the photos I will use yet, but this is potentially one of them...
Hmmmmmm.....
Saturday, March 6, 2010
Wednesday, March 3, 2010
Storytelling: taking great photos for memory albums
I recently had an article published on ezinearticles.com that outlines some tips for taking a great selection of photos for scrapbook albums, and some tips and ideas for capturing the types of images that help to tell a story. I really wanted to highlight some key points with more examples and less text, so I am including the 'picture book' version here. If you woud like to read the full text version, just follow this link
1. Think about the event and plan ahead: if you are going to the beach, or a theme park or a wedding, make a point early on of getting everyone together for one or two photos. Then you KNOW you have a photo of everyone!

Mummy, Teddy and Josie stop for a quick snap just inside the entrance at the reptile park.

 2. Focus on the details: sometimes it takes two photos to tell the story. These two photos are of Ypres cathedral, Belgium. The entire town of Ypres was completely destroyed during the First World War, and the town was rebuilt from the rubble. The photo of the cathedral shows the grand structure, while the close up shows bricks peppered with bullet and shrapnel holes.
3. Experiment with angles: It costs nothing to experiment with digital photography. After you have taken the standard pictures, try something new. I love this photo of Ted with his new baby cousin Aliyah- the photo has great depth and you can just see him holding her hand.

4. Put yourself in the frame: if you are photographing kids, every now and then set the timer and hop into the picture too- your kids will love it. When Daddy took Ted to see Dorothy the Dinosaur in concert two years ago, he knew that I would want pictures of not just Teddy and the people on stage, but of him also- so he asked a fellow Dad in the crowd to take their photo. Well done Daddy!
 5. Take action shots: While posed photos are lovely and make great focal points, action shots are wonderful for supporting the story. Also, if you are staging a posed photo and someone blinks, the photo goes from being beautiful to not so great (and not always noticable on a digital viewer). In this photo, ted is opening a parcel of a new Wiggles DVD he bought with his pocket money. His attention to the parcel is far better at showing how excited he was. Plus, I would not have been able to get him to pose with his DVD- he was too excited abo
 ut watching it!
6. Having fun: Even grown ups can join in the fun or dress ups or playing games. Many museums will have a dress up area for kids to play in, and if you can convince Dad or Grandma to put on a hat and pose with the kids, it will add a wonderful richness to your pages. And you never know, they may even enjoy the excuse NOT to act their age!
 7. Hand over the camera: Giving someone else the camera not only ensures that you get into the photos, but also lets them capture their perspective. My son has a little point and shoot, and he takes photos alongside me (when we know where it is- it is currently MIA). He loves seeing me scrapbook his photos- it makes him feel like he is part of the story too. In this photo, I asked Teddy to photograph his new slide he got for Christmas, and this is what I got. Not what I had in mind, BUT it is a wonderful snapshot of his world.
8. Every now and then, stop and have fun: You don't have to be chief photographer all the time. Give yourself permission to relax and join in the making of memories. If you miss something special, write it down either in a word document or in notebook, and keep the word file in a folder with the photos. That way you won't forget and you will have relaxed and joined in the fun.
Sunday, February 7, 2010
George
 I love my cats so much, but they hardly get a snapshot in my scrap books these days, so when Ted took this photo of george asleep on his bed I was so happy to be able to put a page together about him. He is such a funny cat- one minute he is 'poor old george' of 14, and we wonder how much longer he will grace us with his company, and then three seconds later we find him clawing his way to the top of the curtains.
credits: Randi Oh- Black and white; Sussie M- Secret Garden; font is antipasto from dafont.com
Saturday, February 6, 2010
Photos update
So 365 is too much for me. Well, THERE'S a non- surprise! But Teddy is having so much fun taking his photos, I cannot pull the plug completelly. So we are modifying 365 to project 52. One layout a week, highlighting how wonderful scrapbooking is for showcasing your average photos in the most beautiful way. So let's go for 'quality' over 'quantity'!
I love this photo Teddy took of our cat Georgie- it will be my next page. My first thought when I saw it was 'Slumber disturbed'. So watch this space- hopefully, there will be a page of Georgie-porge here soon!
Sunday, January 10, 2010
day 6 photo

Proudly presenting my first layout proving my point about photography- it is never bad. It is simply all about perspective, and finding the stories beneath the image. One theme over-riding this entire project is that each image was captured by my son as he learnt how to take photos. However, as a general rule I am trying not to use that as proof that all photos have value. It is my 'get out of jail free' card!
Ted snapped this photo of me last week while we were eating dinner. Now, for the most part, this is not a great photo. The exposure is bad, the angle is quite noticably off, I am feeding my face... Most of us would not bother spending the 19c to get this printed. BUT with a little bit of editing, turning it black and white and adding some journalling, a very average photo becomes...

The journalling reads: You snapped this pic while playing with your camera at the end of the day. It was such a busy day with your Dad away, but I was so happy to be enjoying an evening meal with you and Josie. You captured an unguarded moment of simple joy.
I thoroughly enjoyed scrapping this page.
Credits are to
Line Designs: Angels world
Natali: All you need is love
Randi Oh: Annabelle Alpha.
The font used is called Honey Script and I found it at dafont.com
End of week one

Ted has really been enjoying taking his photo each day. One thing that I did not expect to come out of this is the simple enjoyment of looking around and taking photos together. He is so excited when he sees his photo in the viewer, and has also learnt to scroll through his photos and loves to look through them, explaining everything he has photographed.
His day 3 photo is a little bit of a heart-breaker for me. When I discovered it, I wondered how many times he walks into the study to ask me something, and this is what he sees. Eye level with the desk, not being able to see the computer screen clearly, and Mummy working away. It really hit me, I had not thought about his world before I saw this image. Life at 105cms!
 I absolutley could not pass up this shot. I love it. The only vegetable Ted will even contemplate eating is peas. So every night for goodness knows how long, he has eaten peas, cheese and toast for dinner. He really likes his peas.
 I love the angle he has on them here, complete with spoon! And yes, he ate every last one!
Sunday, January 3, 2010
Day Two's image

I began work on the first collection of photos today, and I just had to share the result. I absolutely love the goofy grin Josie has. She is just starting to pull this face when she sees a camera. I was able to lighten her face and add in a nice amount of colour, and by converting the photo from landscape to portrait, I removed Teddy's finger from across the lens.

Teddy picked this shot as his day three photo. His very favourite Big Red Car. He received this as a gift from a friend to celebrate him becoming a big brother when his little sister was born. The Big Red Car goes everywhere- through the garden, in the bath, to the pool.
Ted has just been out with his camera to take today's photo. I should point out that each day there are many many photos to choose from! Being three, he cannot stop at just one picture! It is great to see him so excited about it. Today he found an old Wiggles cloth sunglasses case, and he decided that it would be his very special camera bag. I am excited to see what he has captured today. Speaking of which, I had better find my own photo to take!
An ambitious project?

As scrap for hire specialists, one thing we often here is 'When I get some professional photos taken, I'd love to have them scrapped.' Louise and I are forever trying to convince those we are close to that any photos you may take- every memory, every snap, every crazy goofball face, is a picture with a story that is worth recording.
To date, we have had a hard time convincing others of this. And, to be fair, I can see their point. We both own pretty swish cameras. I have been taking photos with an SLR for over eight years now, and in that time I have read countless magazines and books, practising every new technique. Louise came to photography about two years ago, and has spent alot of time learning about angles and lighting, borrowing many of my books and magazines! Together, we have scrapbooked hundreds, if not thousands of images. In short, people do not really believe us when we say 'every photo has value.'
And so, I thought of a way to proove our point. This year, I am undertaking project 365, to make sure that I do not neglect to scrap my own family as I work on a business helping others to preserve their own stories. So, I decided it would be fun to have my three and a half year old son join me in my project. He will not be using my SLR (my heart couldn't take the pressure). He will be using a sony cyber-shot, 7.2 megapixel that has been through more drops and knocks than Mike Tyson. Alongside me, he will photograph soething that he sees in his day. Something that is part of his life and his story. Our challenge is to scrap that story- to put our claims of scrapbooking greatness on the line- and to make his photos look good. And to start, here is his photo from day 2 (we missed day one- whoops!)
Subscribe to:
Posts (Atom)


